
By Serena Desai
The Production of a Woodcut: A “Crude” Process
Originating in China with the production of detailed print blocks dating all the way back to the Tang Dynasty, and transmitted to Europe as a common illustration technique used until the mid-eighteenth century, the “woodcut” was a type of relief printing frequently used for the decoration and illustration of books, textiles, and wallpaper. According to Kai-wing Chow, author of the chapter Agent of Change: Print Culture Studies after Elizabeth L. Eisenstein, “the essential features of woodblock printing are that the printing block is made of wood and that immovable symbols– text or otherwise– are carved into the block” (Chow 174). In other words, to create a woodcut, one must use a set of knives (called “gauges”) and carve an image in relief, meaning that all blank space is removed from the surface of the block, leaving behind the outline of an image in reverse (so that when copied onto a sheet of paper, the reflection of the carved image will transfer).
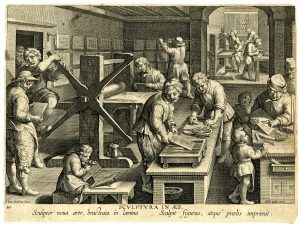
Though copper (and eventually, steel) engravings were introduced to the illustration process around the year 1550– slowly growing more popular as artists realized the precision they offered– woodcuts arguably remained an integral component of the print shop for at least three more centuries. At the height of the Protestant Reformation in the sixteenth and early seventeenth centuries– a time in which a mere 10-30% of the German-speaking population was literate– woodcuts “manifestly played a crucial role” in the spread of Lutheran ideas (Chow 176). A full century later, most ephemeral “job” printing– such as window bills, proclamations, notices, and ballads– was also produced across Europe using woodcuts due to the “simplicity of the technique and the cheapness and availability of the material” (Twyman 18). While intaglio printing oftentimes required printers to commission illustrations from engravers, who would charge large sums for the energy and materials (copper sheets, burins, scrapers, etc.) necessary to carve a precise image, woodcuts could often be completed at a faster pace within the printshops themselves (as is evident in Figure 1).
Though the lack of consensus (namely between Eastern and Western historians) about the advantages and disadvantages of woodblock printing in comparison to intaglio has been written about immensely by several of the authors that we studied as a class this semester (specifically Sarah Werner, Michael Twyman, and Kai-wing Chow), one of the scholarly “disagreements” that had not been thoroughly analyzed in the works we read was the process of carving and printing a woodcut itself. While Chow states that “the skill required” to create the blocks was “relatively simple,” Michael Twyman (author of Printing, 1770-1970: An Illustrated History) argues that it “remained for the most part a rather crude process” (Chow 190, Twyman 18). When I first read these segments of Twyman and Chow’s works, I noted multiple ambiguities. What did “crude” really mean? What did “simplistic” really mean? Were the two words mutually exclusive, or could they both be referring to the same elements of the production process?
In an effort to discover the answers to all of the aforementioned questions (and gain a cathartic experience along the way), I embarked on my journey to hand-carve and print my own woodblock.
Part 1: Acquiring My Materials
The instructions that I used to carry out this project were produced by a relatively-popular YouTube channel called Diode Press, which contains multiple step-by-step videos on how to carve and print woodblocks, create copper engravings, use a rolling press, and carry out other amateur-printing projects at home. Each video contained links to various craft stores where specific items could be bought (such as ink or plywood), so I was able to find most of the materials I needed for the project through my instructional video alone. The link to Diode Press’ “Woodcut Printmaking Basics: 3- Carve and Print Your Block” can be found here: https://www.youtube.com/watch?v=6Z9lU8HTIdg.
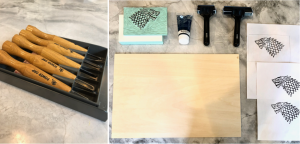
The materials that I used for the project included two brayers (one 2-inch and one 3-inch), a 13 x 8 inch sheet of Shina ply, a set of five U and V-gauges (each of varying widths), some sheets of white copy paper for printing, a tube of black, water-soluble Speedball ink, a rubber square, a wooden spoon, and a hacksaw (which I used to cut a square of plywood to create the woodblock). Some common types of wood that medieval artists may have used to create their illustrations were pine or birch, as these are soft and make the carving process slightly easier. However, one of the disadvantages of using the aforementioned wood varieties is that they both require the artist to carve with the grain, which can create significant obstacles when carving around intricate lines. For this reason, I decided to use a type of Japanese plywood called Shina ply, which allows the artist to carve in any direction (even if it is against the grain).
The reason why I decided to buy a rubber square was so that I could: 1) have a backup option in case my wood carving did not come out the way I wanted, and 2) carve a “prototype” version into the rubber stamp so I could get an understanding of where my “problem areas” were and fix any mistakes before moving on to the wood. Lastly, I want to make a quick note about the wooden spoon, which I used in place of a baren in order to rub the ink onto the paper. The Diode Press YouTube clip stated that using a wooden spoon would be a perfectly acceptable alternative to the baren, so I decided that even if it was not completely authentic, I would use the spoon to be as economic as possible when buying materials.
Part 2: Creating the Prototype
Step 1: Transferring the Image

To create my “prototype” version of the woodcut on a rubber stamp, the first step I took was to choose the image that I wanted to carve. As an avid Game of Thrones fan (and self-proclaimed member of House Stark), I decided that I wanted to reproduce the Stark sigil– the dire wolf– onto my stamp. After finding an image of the sigil on Google Images and printing it out, I took a sharpened pencil and colored in all of the areas in the image that were black. Instead of being forced to draw the image by hand onto the rubber block (which likely would not have come out as crisp or clean as the picture itself), I decided that the best way to transfer the image would be to outline the image with dark pencil strokes, flip the page onto the white surface of the rubber block, and then do a “pencil rubbing” to transfer the lead of the pencil onto my pseudo- “woodblock.” One of the major miscalculations I made during this part of the project was believing that if I printed out my desired image in reverse, my final prints would be facing the correct direction; however, I did not realize that by transferring the image from my print-out to the rubber stamp via a pencil-rubbing, the image would flip back to the correct direction, thereby ensuring that all of my final prints once again faced in the opposite direction. Fortunately, I was able to fix this mistake when using the Shina ply. Once I had completed the transfer onto the rubber stamp, I outlined the image in black marker so that the lines would be easier to see while carving (this would also prevent smudging as well).
Step 2: Carving the Image
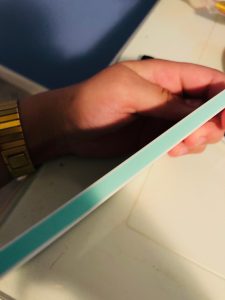
Once the Stark sigil had successfully been transferred onto the surface of my rubber stamp, I was ready to carve. The U and V-gauges I had bought were a bit wider than I expected them to be, which was a large concern of mine at the start of the project; I was not sure if the width of my tools would prevent me from creating the detailed woodcut I aspired to produce. However, the process was surprisingly easy (likely as a result of the medium I was working with); not only did the rubber bend to allow my wide gauges to dig deeply and smoothly across its surface, but the fact that I was using rubber meant that “splintering” and “splitting” were not factors that hindered the carving process. The hardest part of the image was undoubtedly the area around the teeth and the detailing in the ear of the dire wolf, especially because carving these portions of the image required blades much smaller than the ones I had purchased. However, the dire wolf’s coat, made up of curved scales, took less than an hour to carve. One of the advantages of using the rubber blocks I had purchased was that they came in a rectangular size (3 x 6 inches) that happened to be the exact size necessary to fit the dire wolf image that I had printed. Additionally, the rubber (which was ¼ inch thick) was layered; while the first millimeter of rubber was white, a thick blue layer was directly underneath, allowing me to determine whether or not the strokes of my gauges were carving at a uniform depth as I outlined the image of the dire wolf.
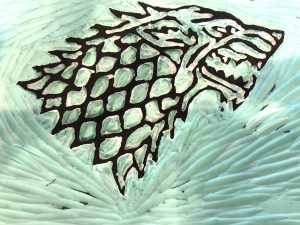
Though this was a relatively simple process, I was not immune to mistakes. The teeth of the direwolf did not come out the way I wanted them to (since they were so small and easy to carve off completely). Notice that while the bottom row of teeth have not been “hollowed out” by the gouges, I made some attempts to hollow the top row, thus creating an “unfinished look” in my final prints. Additionally, I slipped up a few times while carving the “scales” in the fur coat of the dire wolf; the gaps where I accidentally cut away part of the wolf’s coat are quite visible when viewing my stamp up close.
Step 3: Inking and Printing the Image
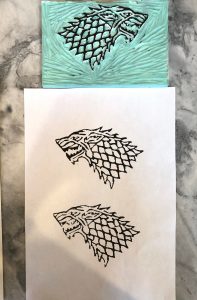
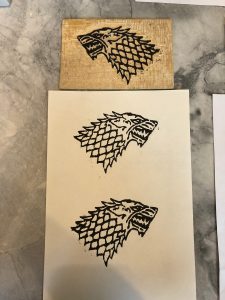
In order to ensure that a uniform layer of ink was rolled onto my woodblock, I squeezed a bit of Speedball ink onto a paper plate and used by brayer to roll back and forth across the glob until it “made the sound of sizzling bacon”– a tip provided to me by the Diode Press instructional video I was using. Next, I rolled the ink onto the carved rubber stamp, hoping that none of the excess ink smudged onto areas that I did not wish to be printed. Fortunately, I had done a thorough job carving the rubber block, and there were very few areas that needed extra carving in order to rid the surface of excess ink. After I was sure that the dire wolf got an even coating of ink, I took a white sheet of copy paper and placed it carefully on top of the block (the same way that we learned in our class on East Asian printing), and used my wooden spoon to rub the ink into the paper through the sheet. After about thirty seconds of rubbing, I lifted the sheet, revealing my surprisingly-crisp image. I was not expecting my print to be so detailed the first time around; though gaps in the print were visible where I had slipped up with my gauges, the dire wolf (for the most part) remained in tact, and its edges were quite clean. Though I was proud of myself, I knew that printing with the Shina ply was likely going to be a bit more time-consuming– although I was certainly not prepared for the three-hour process that it took to create the final product using wood instead of rubber.
Part 3: Creating the Final Product
Step 1: Sawing the Shina Ply
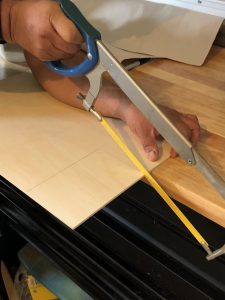
When I first bought my sheet of Shina plywood, I guessed that it would only take me a few strokes with an Exacto knife to cut a square small enough for my woodcut. However, upon going over the board multiple times with a variety of tools (sustaining some bad cuts in the process), I realized that I would need a saw to cut a square at the size necessary to fit my direwolf image. Fortunately, my father was available to help me out, and he used a hacksaw to cut a rectangle the exact same size as the rubber stamp I was using for my prototype.
Step 2: Transferring the Image
Transferring the image onto the Shina ply was not any more difficult than copying it onto the rubber surface in my practice woodcut; it simply required me to outline my image in pencil, flip the sheet onto my piece of wood, and then do a quick pencil rubbing in order to transfer the image onto the board. This time, I made sure to print out my image in the correct (original) orientation so that when I transferred it onto the Shina ply, it would be in reverse– thus allowing the final prints to revert back to the correct position. I’ve laid out a simple diagram below to exemplify what I mean:
Original Image (Direwolf’s Head Pointing Right)
↓
Transferred Image Onto Shina Ply (Direwolf’s Head Pointing Left)
↓
Printed Image onto Sheet of Paper (Direwolf’s Head Pointing Right Once Again)
After transferring the image onto the wooden board, I outlined it using a black marker to prepare for carving.
Step 3: Carving the Woodblock
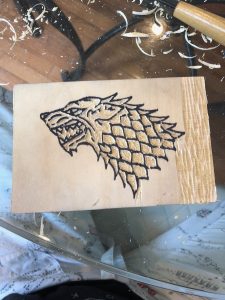
Though I had decided to carve my rubber stamp as a “practice round” for the woodcut, I must admit that this medium gave me a false understanding of just how much more difficult the process would be on a woodblock. Though the Diode Press video had stated that Shina ply could be carved in any direction, I realized quite quickly that carving horizontally (against the gain), while possible, did not create the crisp lines that I produced when carving into the rubber. One of the main issues was that the wood kept splintering and completely breaking off in large chunks each time my gauge slipped, creating large “holes” and “gaps” in the lines that comprised the woodcut. Furthermore, unlike rubber, wood is not pliable, meaning that it did not simply “bend” around my blade to allow me to cut at sharp corners or create rounded edges, instead, it completely split, once again creating gaps in my final design. Parts of the dire wolf were so intricate (especially around the mouth and ear area) that I had to modify the image entirely, cutting away lines that should have been left in tact so that I did not have to worry about extremely fine detail. Instead of attempting to “hollow out” the teeth like I did with the rubber stamp, I left them completely filled in, which fortunately did not affect the overall “aesthetic” of the sigil as much as I thought it would.
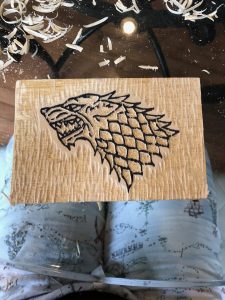
The second issue of carving with wood was that the tips of my blades became more blunt as I continued to push them against the grain, thus making it more difficult to carve a precise design. When my smallest U-gauge became too dull, I switched to my V-gauge to help eliminate some of the splintering that was occurring. I soon realized that while the V-gauge was unideal for the rubber– as it tended to cut more deeply than I wanted it to– it happened to be the best tool to carve the wood. While the U-gauges were too wide, the V-gauge could carve away the intricate pieces necessary to produce my design.
Step 4: Inking and Printing the Image
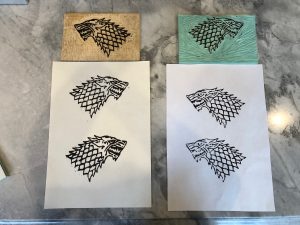
Unlike with my rubber stamp, inking and printing my woodcut took multiple tries to perfect; the wood tended to absorb some of the water-soluble ink if I left it on the board too long, thus causing the image to come out faded or patchy. On the other hand, if I applied too much ink to the surface of the wood, it pooled on the printed sheet, causing bleeding and smudges. The trick was to roll the brayer in the ink for about ten seconds, transfer it onto the woodcut, and then immediately use the spoon to press the ink into the sheet of paper. Even my best results were still a bit patchy, but overall, I think I made a great print (especially considering the medium I was using, which was extraordinarily difficult to carve). What took me less than an hour for the prototype took me three or four times as long for the “real product”– a period during which I must have cut myself at least two or three times.
Part 4: Some Brief Takeaways
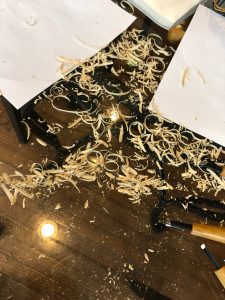
The last thing that I took away from this process was that both Twyman and Chow were correct when they stated that the creation of a woodcut was both “crude” and “simplistic”; arguably, the theoretical concept of cutting away the blank spaces on a piece of wood to create an illustration is not difficult to understand. The fact that a child could comprehend the process of carving a woodblock makes the art-form simple, as Chow stated in his work on East-Asian printing. However, the laborious process of gripping a gauge and pushing it over and over across a sheet of unforgiving plywood makes the process undeniably crude; after three hours of carving, not only did I have carpal tunnel in my right forearm, but I was actually sweating— something I never expected from this experience. After I was finished with my woodblock, there were woodshavings everywhere— on the table, all over the floor, in my hair, and stuck to my clothes. The water-soluble ink that I had used for the project was all over my hands, and two of my fingers were wrapped in bandaids by the end of the process. One of the final takeaways about this project was that creating a woodblock must have been messy; anyone who is afraid of getting their hands a little dirty shouldn’t embark on the journey of carving a woodcut.
My second takeaway from this project was the realization of just how much patience was required to create an intricate woodcut design. Unlike with the rubber stamp, the woodblock was coarse and unforgiving; carving against the grain forced me to hold down the woodblock with one hand and force the gauge across the wood with the other hand, all while attempting to focus the strokes of the blade in a very small, constricted area. While it requires strength to carve, it also requires attention-to-detail. There is quite literally no room for mistakes; a bit of extra pressure on the U-gauge causes the entire blade to slip across the wood, carving away important detailing along with it. I nearly lost the eye of my dire-wolf to a casual slip of the gauge. I have a newfound respect for medieval carvers whose designs were at least five times more complex than mine, and who were able to create lines so crisp that contemporary readers have trouble telling the difference between the woodcut and an engraving.
Though the carving process was laborious and time-consuming, it was cathartic as well, allowing me to relax my brain for a few hours and listen to my iTunes playlist– which was a much-needed break from finals week. It was also rather fascinating to think that I was creating an authentic woodcut using the same processes that medieval artists and printers would have used; as cliche as it may sound, there was an “aura” that came with repeating the steps that ancient dynasties and medieval engravers used to produce images that could be understood by both the illiterate and literate across the globe. One of the reasons why I decided to make a woodcut in the first place was because I had read that it was a common way of producing images in German-speaking countries during the Protestant Reformation– an area of history that I have studied extensively as a result of my Pet Book Project. While I was printing, I couldn’t help but feel a connection to George Rhau (the printer of Calendarium Historicum Conscriptum), which certainly made the process a little more special.
*A Personal Ending Note: Since I still have a bunch of materials left over from the project, I am sure that my empty summer months will be filled with carving and printing; eventually, the process should get easier. For now, I will enjoy the fruits of my labor by hanging my prints in my new bedroom as my family moves from Shrewsbury to Hopkinton.
Sources:
https://moodle.colby.edu/pluginfile.php/374735/mod_resource/content/0/Printing_pg18-110.pdf
https://moodle.colby.edu/pluginfile.php/389872/mod_resource/content/0/werner.pdf